Thermal Cup
Built by: Megan Davisson, Greg Rummel, and Bo Smith/Spring 2018/BAE 305
Summary
The purpose of the thermal cup was to allow for sustained heating of beverages while drinking. Warm drinks cool quickly in cool conditions without the application of heat. With the Thermal Cup, the beverage will be sustained at a specified temperature of 104° F. This system could be useful in other applications when applied at a different scale, such as heating of a home aquarium, swimming pool, or bathtub.
Features
- Warms beverages over time using thermo-electric blanket
- Detachable from container for safe troubleshooting
- Runs from a simple 7.4V rechargeable battery source
- Transistor switch to turn thermo-electric blanket and circuit on/off
- Insulation foam inside of cup to trap heat
Video
To see a short video about the thermal cup, please go to: https://youtu.be/ryDpx3QG2QU
Materials
Materials
- 7.4V rechargeable battery
- Micro-USB Cable (for charging battery)
- 3x 330Ω resistor
- 5V Converter
- 2x NPN transistors
- Thermo-electric Blanket
- SparkFun ESP32 Thing Microcontroller
- LM Series Precision Temperature Sensor
- Breadboard
- Wires
- Stainless Steel & Copper Insulated Cup
- Hot Glue
- Spray Insulation Foam
Tools
- Hot Glue Gun
- Soldering Iron
- Wire Strippers
- Hammer
- Flat Head Screwdriver
- Electrical Tape
Assembly Procedure
Circuit:
- The first part of the circuit is to take the ESP32 Thing and place it onto a breadboard.
- Designate the power rails
- Place desired transistors on the breadboard
- Run the a wire from the desired pin on the ESP32 to pin 1 of one of the NPN transistors. Also connect pin 1 to the power rail through a 1kOhm resistor.
- Connect pin 3 on the same transistor to ground.
- Then run pin 1 of transistor one to pin 2 of transistor two. While connecting pin 3 of transistor two to ground and pin one to the battery through a 330 kOhm resistor.
- Place the 5V converter on the breadboard.
- From the battery connect to pin 3 through a 1kOhm resistor, connect ground to pin 2 and run a wire from pin 3 to the ESP32.
- From the 5V converter connect the temperature sensor. Pin 3 and pin 2 are connected to power and ground respectively from the temperature sensor to the 5V converter. Data (pin 2) of the temperature sensor connects to pin 2 on the 5V converter.
Design:
- Obtain an Ozark Trail Mug, and using utensils of your choice pop the bottom cap off.
- Once the bottom cap is off, cut the aluminum bottom of the cup (careful, the inside is pressurized).
- Attach the top of the 3-D print to the bottom aluminum portion of the cup.
- Using adhesive of your choice, place thermoelectric blanket inside of the cup.
- Using foam insulation of your choice, insert tip into cup and insulate the cup.
- After the adhesive and insulation have dried, connect the blanket to the circuit.
- Using the big 3-D extension encapsulate the circuits. Next is your choice, make sure the battery is charged!
Schematics
Circuit Schematic
.png)
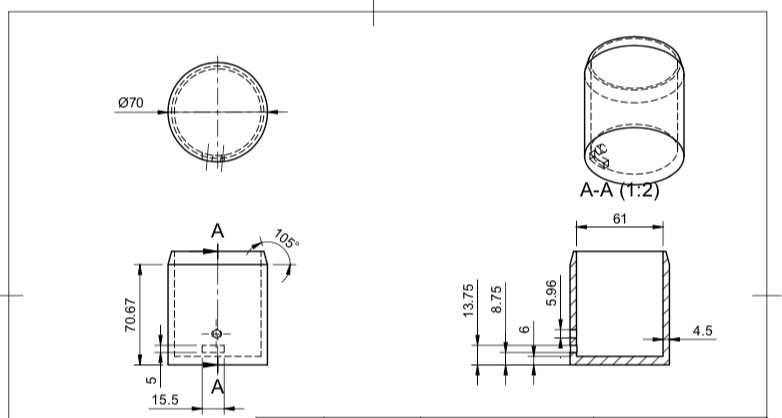
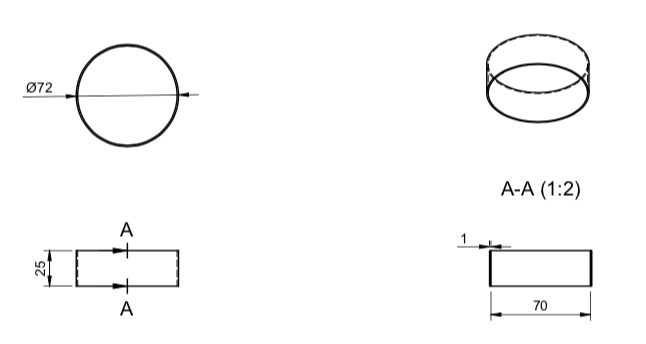
Engineering Drawings
Note: All measurements in millimeters (mm).
Cup Bottom
Cup Ring
Programming Code
void setup() {
  // put your setup code here, to run once:
  Serial.begin(9600);
  pinMode(18, OUTPUT);
}

void loop() {
  // put your main code here, to run repeatedly:
  int Temp = analogRead(18);
  float Voltage = Temp * (5/2048.0);
  float Kelvin = Voltage* (1/.01);
  float Celsius = Kelvin - 303.15;
  Serial.println(Celsius);
  delay(1000);
  {
  if (Celsius > 10)
  digitalWrite(18,HIGH);
  Serial.println("H");

  else
  {
  digitalWrite(18, LOW);
  Serial.println("L");
  }
}
Test Equipment & Procedures
Equipment
- Infrared Temperature Sensor
- Multimeter
- Thermometer
Procedure
- We tested our heating pad by turning the circuit on and pointing the Infrared Temperature Sensor at the pad. This helped us to determine the heating capabilities of the pad.
- We tested the completed circuit and all of the components using a multimeter. This was to make sure that each component had the appropriate voltage/current running through it to function as intended.
- When the cup was completed, we inserted the thermometer in the water at the top of the cup. This was to test the functionality of the entire cup to see if the water would actually get hot.
Discussion
Design Decisions
In building the cup, we opted to purchase a cheap metal travel mug for its insulating properties. Our thinking was that the better insulated mug would lose much less heat than a poorly insulated plastic cup. To meet this criteria, the Ozark Trail mug from Walmart was selected.
We also required a heating element for the project, and had to decide between more powerful semiconductor elements or a highly resistant heating blanket. The semiconductor element required a battery that was larger than our intended travel design, therefore leading us to using the Ultra Heating Fabric. This blanket required a slightly larger battery than we intended, and the voltage had to be stepped down to 5V to run the ESP32 Thing from Sparkfun. This lead to our inclusion of the voltage regulator. However, because the board was not at the voltage needed to run the blanket element, a MOSFET was required to bring the voltage back up to the value necessary to heat at an appropriate level.
Finally, there existed many complications with our intended temperature sensor. The Waterproof DS18B20 OneWire sensor was our intended sensor to determine the temperature of the liquid. However, the sensor was not compatible with our existing circuit. In the end, we switched to the National Semiconductor line of Precision Temperature Sensor currently in our circuit. This sensor is not waterproof, and is not as accurate as the DS18B20 was to be, but it drastically simplified the code and could be attached to the copper insert of the travel mug to read a similar temperature to that of the liquid.
Test Results
-
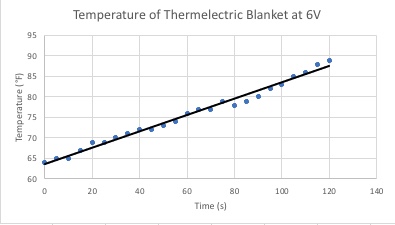
Below are the test results from the measurements of the thermal blanket with a voltage source of 6V.
-
There are no results to be shown for the testing with the multimeter. We did this simply to ensure the actual function of the circuit components.
-
The cup functioned and water was heated from 75.2°F to 105.8°F
References
-
Arduino. (2018). ReadAnalogVoltage. Retrieved from: www.arduino.cc/en/Tutorial/ReadAnalogVoltage
-
Arduino Project Hub. (2016). Arduino Thermometer with DS18B20. Retrieved from: https://create.arduino.cc/projecthub/TheGadgetBoy/ds18b20-digital-temperature-sensor-and-arduino-9cc806
-
Fairchild Semiconductor. (2004). RFP30N06LE, RF1S30N06LESM Data Sheet. Retrieved from: www.sparkfun.com/datasheets/Components/General/RFP30N06LE.pdf
-
WireKinetics, CO., LTD. Ultra Heating Fabric Data Sheet. Retrieved from: cdn-https://shop.adafruit.com/datasheets/Ultra+Heating+Fabric.pdf